
This tutorial was written by me on July 22nd 2009
Supplies you will need:
template #36 by Saras Scraps blog not found at time of re-adding tutorial
mask #84 by weescotlass
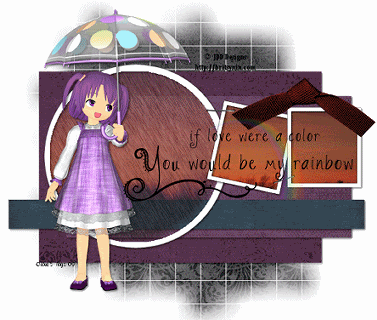
a tube that would look good with rain mine is by JDD Designs from BristyNin
Scrap Kit 'Elenor' by Cinnamon Scraps
A background image
Plug Ins: Vanderlee Snowflakes
Begin by opening up your template and duplicate it (shift+D) to protect the original
image > canvas size > 700 x 700 (to give us room to work) we will crop later
delete the copyright layer
and add a new layer, flood fill with white so we can see what we are working on
open up a paper of choice and paste as a new layer above your white layer
apply the mask and merge group
activate 'rectangle1' > selections > select all > selections > float > selections > defloat
choose a paper of choice and paste as a new layer
selections > invert and hit delete
delete the original rectangle1 layer
repeat these steps for 'rectangle2' and 'rectangle3'add a small drop shadow to all these 3 layers
vertical~2...Horizontal~2...Opacity~50...Blur~5.00...Colour~Black
open up the image supplied by me or one of choice
using your magic wand, click inside the large circle
selections > modify > expand by 3
paste the image as a new layer and place where you like
selections > invert > hit delete on your keyboard
selections > invert and activate the 'circle1' layer and hit delete again
selections > select none
move the image to below the 'circle1'lower the opacity on the image to around 60
activate the right square frame and again repeat the steps above and delete the original black frame repeat with the other frame
add the same drop shadow to the frame layers
hide all the layers except for the mask, and rectangles > layers > merge > merge visible
unhide now hide all layers except the white circle frame and the 2 filled squares > layers > merge > merge visible
you should now only have 4 layers : white background, template, large filled circle and the square layer
open up the tube and copy and paste as a new layer > image > mirror
add the same drop shadow as before
activate the layer with your filled image on the circle and selections > select all > selections > float > selections > defloat
duplicate twice to make 3 layers of iton the top layer go to adjust > add noise with these settings:uniform...monochrome~checked...noise~100%repeat for all 3 rain layers
on the top layer go to adjust > blur > motion blur with these settings:angle~330...strength~35
repeat this for the other 2 layers
selections > select noneopen up 'bow3' and paste as a new layer, place where u like and add a drop shadow
open up the word art and paste as a new layer
add your watermark and the copyright and image > resize > 75% > all layers
add any text you wish to the tag
time to animate:rename the rain layers: rain1, rain2 and rain3
hide rain2 and rain3 and > copy merged and paste into animation shop
unhide rain2 and hide rain1 > copy merged and paste into animation shop after current frame
unhide rain3 and hide rain2 > copy merged and paste into animation shop after current frame
view animation and save
No comments:
Post a Comment